
Tech Tips
R&R OEM Serpentine Belt
The first thing you need to determine the correct size belt. Depending on the number of miles on your coach you may be able to read the part number of the belt, that's assuming it is visible from under the coach. There have been reports that some engines will use a 108" belt and others will use a 103" belt.
Update - I received information that the 103" belt is for the P32's and the 108" belt is for the W series. The difference in sizes is due to the pulley size difference between the P32 and W series.
- OEM: BELT - FAN & WATER PUMP & AIR CONDITIONING COMPRESSOR
& GENERATOR & POWER STEERING PUMP
W0000581 : BELT - FAN & WATER PUMP
Quantity : 1
Service Part : W0000581 - Napa part # 25-061080
- Gates part # K061080 - $31 at O'Reilly's Auto Parts
- AC Delco part # 6K1080
- Dayco part # 5061080
- Goodyear part # 4061080
Belt Removal:

1. Install a 3/8" drive ratchet on the drive belt tensioner arm and rotate the tensioner arm clockwise.
2. Remove the drive belt.
Note - This may take
some work from above via the dog house and below the coach.
3.Slowly release the tension on the drive belt tensioner pulley.
Belt Installation:

1. Route the belt over all the pulleys except the tensioner pulley.
2. Using th 3/8" drive ratchet rotate the tensioner arm clockwise and position drive over the tensioner arm pulley.
3. Slowly release the tension on the drive belt tensioner pulley.
OEM Fan Shroud Fix
If your coach is a model year 2005 or greater you probably already have this fix installed. But, if you have a model year 2004 or earlier then you may want to check to see that this fix is installed.
The failure to install one or two 5-cent self-tapping screws in the lower fan shroud could cost you a new radiator or more.
The Problem

The Difference

The Fix

OEM Brake Bellcrank Fix
Back in late 2003 or early 2004 there were a number of people that reported that the brake pedal did not return completely. The usual fix was for the dealer to install some sort of return spring on the brake bellcrank. But, the OEM supposedly fixed the problem by adding a grease zerk to the bellcrank shaft. If you were under warranty the OEM chassis manufacturer will install it free. I elected to do mine own as I was 150 miles from my dealer.
I use a 1/4x28 Grease Zerk. This takes a #3 drill bit or 7/32 drill bit for the proper tap.
Be careful when you drill the pilot hole to not drill into the shaft, if you do not want to pull the shaft out or move it at pass the point you plan to drill the pilot hole.
The Problem

The Fix

The Tools

Headlight & Tailight Replacement
I had the to replace the passengers side headlight due a bulb reflector falling off. I sent the dealer some photos and they order the part. But, when I got the parts I found some information printed on the box that led me to origin of what vehicle the headlights and side markers came from.... 1998 - 2002 Mercury Grand Marquis. That got me to wondering what vehicle the taillights came from. If you look real close you probably will find something like this TYC 11-3066 embossed on the taillight. When you search the Internet you will find that this is an OEM part number and it is a taillight for 1993 -1997 Ford Ranger.
The cost of the headlight from Newmar though the dealer was $94. But, I could order the same headlight off the Internet for $45. Go figure! But, in my case I was still under the 3 year warranty and got it replaced free.
Now getting the headlight installed was another matter. Neither the dealer nor Newmar could tell me how to R&R the headlight. I ultimately reversed engineered it and Got-R-Done.

R&R Water Heater Anode Rod
Should you replace the Anode Rod in your water heater? Well it depends...
If you have an Atwood water heater then the answer is probably NEVER. Atwood has an aluminum tank and anode rod is not needed according to Atwood.
But, if you have a Suburban water heater then the answer is YES. But, how often? Again it depends. If you don't use your RV on a continuous basis and leave the water heater full of water then it should be checked at least every 6 months. I fulltime and I check mine once a year. So far I have not had to replace the anode rod in about 2 years.
Before & After

Here is what happens when you don't drain the water heater and it sits for weeks a time. More than likely the next time you use the hot water in the coach it will have a rotten egg smell. That means you will have to drain and sanitize the system before you can use it.

Note - You may have gotten here via Tech Tips. Use the link below to return to Tech Tips.
Steer Safe
My class C had a steering stabilizer installed from the factory. But, as will most factory-installed items it was not all that great. So, I change it out for a heavy-duty version at the same time I installed Bilstein shocks. Man what a difference.
So, before I became a Brazel's dealer I looked at Steer Safe and Safe-T-Plus as a add-on for steering control for my class A. I was about ready to spring for a Safe-T-Plus when I found a Steer Safe at a Saturday Garage Sale at a RV park where we staying for $150. The seller was trading up and the dealer didn't want to give him any extra for his various upgrades so he decided to remove them and sell them on his own.
One thing to be aware of is the steering cut changed in April of 2004 from 48 to 50 . This change required a major change to Steer Safe and earlier versions will not work on 2004 and up OEM chassis's. Yes I have a 2004 built motor home with a OEM Chassis. But, the chassis was built in December of 2003... thus I don't have the 50 steering cut.


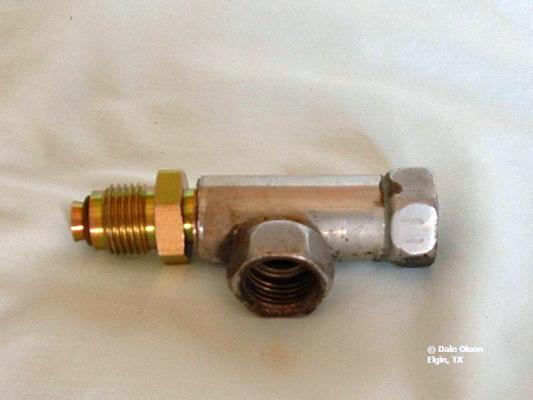
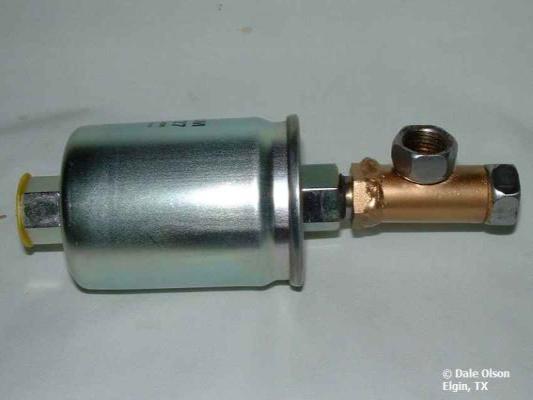
Fuel Filter Adpater
The following is strictly the opinion of the writer based on his experience with the OEM fuel filter.
Jack Aschenback - AKA HuskyJack, is the original designer and produced the first working adapter.
In 2004 the OEM chassis manufacturer, along with GM I assume, decided to change the fuel return system. They removed about 35'+ of fuel return line in favor of a fuel filter with an attached "T" that allowed them to have a "Return less" fuel system as they called it.
Update 3-18-2009
It should be noted that part of the reason for the change was due to a "vapor lock" problem when the fuel tank was down below 1/4 of a tank. The cause for this is:
- The fuel travels the full length of the chassis to the fuel rail and any excess is routed back to the tank. This allows the fuel to heat up.
- The return line was fairly close to the fuel pump pickup. So, you had warm fuel being dumped next to the pump.
- The fuel pump is cooled by the fuel in the tank. Thus, warm fuel is being picked up by the pump
Although the new 3 port design does resolve the vapor lock problem by relocating the placement of the return line away from the pickup and the fuel does not absorb as much heat, the new design has some issues.
The new design has the following problems:
- The cost of the filter went from $10 to about $60 or more.
- The fuel filter is only available from the OEM (proprietary part).
- The fuel filter is not generally available from dealers or the OEM
Service Centers for any number of reasons.
- High Cost?
- Low usage? Due to high cost?
- Parts Availability?
- The OEM only has a single source of manufacture for the filter.
- The original manufacturer went bankrupt and the OEM was without a supplier for some period of time.
- The OEM did find a new supplier but it is still single-sourced
- You have to disconnect 4 clamps and 3 fuel fittings to install a new filter.
- The filter filters 2 to 3x more fuel due to the very short return line. Thus a bad load of fuel will probably plug the filter quicker.
The Adapter provides the following advantages?
- The cost to build one is under $50 for parts and labor.
- The replacement filters cost about $10.
- The replacement filter can be purchased at any auto supply house.
- You only have to disconnect 1 fuel fitting to install.


I even built a tester to make sure I didn't have any leaks before I installed my adapter.

US Gear Unified Tow Brake
I towed for about 2 years using a tow dolly. That was until I blew 2 NEW tires in about 3 months and almost wrecked my wife's PT Cruiser. So, I bought a 97 Honda CRV and installed a Road Master Stowmaster 5K tow bar. I started to look at auxiliary braking and was about to buy an M&G system when I found a used US Gear UTB for sale on the IRV2 Classified ads for $250.
I had to get a few missing parts and make two connection cables. US Gear wanted about $100 for the cables I made for about $25.
As for the installation, just follow the supplied instructions and you are good to go. It took me about 1 day to do both the coach and toad.
Bottom line - Don't leave home with an auxiliary tow brake system.
How To
- Costs:
- Used UTB $275.00
- Blocking diode $31.00
- Check Valve $31.00
- 20 amp auto reset fuse $15.00
- 50' #14 wire $10.00
- 0' #16 wire $10.00
- 5 pkg 10' Cable cover $12.00
- 1 pkg 7" tie wraps $2.00
- Misc. wire connectors $3.00
- TOTAL $389.00
On the inside of the tow you need to install the solenoid and route the auxiliary brake cable under the carpet, mount the cable attachment bracket and adjust the cable to the brake pedal. You also need to attach a few wires, mount the control box (I used tie wraps) and route the control wires through the firewall. Under the hood, you need to mount the auxiliary vacuum pump, install the vacuum check valve, vacuum T, install the 40-amp auto reset circuit breaker, install the various control wires and install the breakaway switch. I just followed the instructions provided in the original install manual.
On the motor home you install the control module either on the shift arm or on a fixed spot on the dash. I chose the dash. You need to find a switched ignition source (I used an unused plug), ground source (same plug), install the blocking diode in the brake circuit and route the control line to the rear of the coach. In the engine compartment, you need to install the 20-amp auto reset circuit breaker and find a 12-volt chassis battery source. This provides the 12 volts need to run the auxiliary vacuum pump/charge the battery in the tow vehicle. Now comes the fun part, routing the 12-volt wire and the control module wire from the front to the back of the coach. It took me about 2 hours to route and tie wrap it in. I was able to use a mechanics creeper to roll around under the coach and it made the job much easier.
Toad Wiring


Coach Wiring


Fuel Filters
I decided to see what the difference was between the OEM fuel filter and the GF481 style filter. To that end, I cut the stock OEM fuel filter a part along with a Fram G3727 (GF481) to see what the difference was. But, I felt that just 2 filters wasn't a fair comparison so I bought 2 more to give a better comparison. Is 4 different enough, I don't know. But, the purpose of this exercise is to show what are the differences between fuel filters. I don't think more filters would yield anything different unless I had a way to test them.
If you review the RAW data you will see that the Fram and Champion Labs filters have between 65% to 70% more filter material than the OEM filter has, so draw your own conclusions.
NOTES:
- It seems that GM has changed the part number and up the price. The GF481 has been replaced with the GF652. The AC Delco GF481 sells for about $10 and the GF652 sells for about $20.
- There seem to be 2 methods of construction.
- Welding the can to the assembled filter.
- Crimping the can to the assembled filter.
- Currently there are 3 unknowns in this comparison.
- Specs on the filter paper contained in the fuel filter.
- A way to test the fuel filter's ability to filter out contaminates.
- Measure flow rate under normal fuel line pressure'
- The total filter area in square inches is calculated as follows:
- ( Number of pleats x 2) * (Pleat size * Pleat height)
- I figure this will be within +/- 3% of the actual.

OEM Dual Outlet Filter
OEM Version
Cost - $45 to $77 or more
Availability -
the OEM Service Centers Only & Oemy's UltraPower Performance
Country of
Manufacture - USA
Total Filter Area - 70 square inches
GF481/652 Filters
Micro Guard - Ozark Automotive
Cost - $6
Availability - O'Reilly's Auto
Parts stores
Country of Manufacture - Taiwan
Total Filter Area - 70.3
square inches
Fram - Honeywell
Cost - $10
Availability - Auto Parts Stores & Wal
Mart
Country of Manufacture - China
Total Filter Area - 120.3 square
inches
Luber Finer - Champion Laboratories
Cost - $6
Availability - AutoZone
Auto Parts stores
Country of Manufacture - China
Total Filter Area - 115.9
square inches
Air Card & Cell Phone Antenna
I live far enough out in the country that my only Internet option is dialup, An Air Card or Satellite. The very best I get from dialup is about 28.8. Satellite is a very go-to option but it is not mobile for a full-timer. So, the only other option is an Air Card.
I got a Sprint U720 Air Card (EVDO & 1xRTT) as this plan did not require a Sprint cell phone account and has unlimited usage with no roaming charges. But, I live far enough out in the county that I have very poor cell phone and air card reception. So, I decided to try a Wilson Cell Phone antenna with a 3-db gain amplifier. With this setup, I can usually get on the Internet at speeds about 3x to my current dialup.
Update... 3/24/2009
Sprint has changed their plan to 5 gigs per month and
300 meg when roaming. I went over the 300 meg number and my contract was
terminated. So, about on 1/7/2009, I switched to Verizon. See the update further
down in this section.
My U720 air card and Verizon Motorola phone use the same antenna adapter. This allows me to use the cell phone in marginal areas when I am on the road along with Internet access with the air card.
Because of the height of the antenna I decided to make it portable. I fabricated a bracket that fits over the rain gutter to mount the antenna. I added a small piece of rubber that fits over the rain cutter to protect it from the bracket. I use a small "C" clamp to hold it in place.
PARTS:
- Wilson Trucker Cell Antenna - Prime Cellular - $39
- CDMA Daul Band Amplifier - Prime Cellular - $189
- Cell Phone/Air Card Adapter - Prime Cellular - $10
- Amplifier AC adapter - Prime Celluar -$20


Does the antenna and amp make a difference? You bet. Here are a couple of photos that show the difference. I took this on 6/22/2008 at Cedar Ridge Corps of Engineers Park in Lake Belton, TX. I had 5 bars on my Verizon cell phone and 0% on the Sprint Air card. I put the antenna on the drip rail, plugged it in and walla I had 100% showing.


Verizon Air Card Update
I switched to Verizon after being terminated by Sprint for going over 300 meg of data when roaming.
I am now using a Pantech UM175 air card and with the Wilson antenna & 3 db amp. I am getting "broadband" speed inside my metal RV Barn and have canceled my dialup that I used as a backup.

I have also mounted the antenna & amp permanently.


External Antenna Update
Although I was able to use the Verizon Air Card inside my metal building it was a hit or miss depending on the weather. I did some research on external antennas and most folks recommended a Yagi antenna as it gives the biggest boost in signal. But, it is directional, only covers the 800 MHz band and requires a metal mounting pole. So, I decided to install another Wilson Trucker antenna as it is easy to mount, covers the 800/1900 MHz bands and mounts via a nut/bolt arrangement.
I contacted Prime Cellular and ordered the antenna with a 15' low loss extension cable and mounted it on the roof vent of my RV barn. I routed the cable down through the roof vent, then through the window of the RV and attached it to the Wilson amp. I now get 100% on my Verizon air card.

Here are a couple of screenshots of the Verizon Access Manager without the external antenna/amp and one with the external antenna/amp.

